How to clean a fishing reel: step-by-step
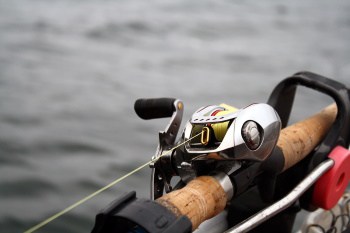
The fishing reel is perhaps the most important component of a fishing rod setup as it determines the accuracy of casting and placing the bait or lure in the water and is responsible for reeling in fishing line with speed and efficiency. Today’s fishing reels are technological marvels with inner mechanisms that, with proper care and maintenance, can provide many years of reliable service.
In this article, we go over how to clean a fishing reel with this step-by-step guide. The process begins with a thorough cleaning of exterior surfaces. Because fishing reels are mechanical devices with moving parts, it will be necessary to dismantle them to access inner gear systems for thorough cleaning. The final step is to re-lubricate vital components to keep things in prime working condition.
There is a common misconception that because the inner workings of a fishing reel are enclosed, there is no need to clean them. Or, that simply spraying with a garden hose after each fishing expedition will suffice. Neither of these is true, and as we will see, the more you know about how a fishing reel and its components work, the better you can care for and maintain this critical piece in your fishing arsenal.
The Different Types of Fishing Reels
A fishing reel is a mechanical device that basically consists of fishing line tightly wound on a spool and a system of gears and drives operated by a manual crank. All reels allow the fishing line to be cast or thrown (with a bait or lure attached to the end of the line) out toward a body of water. Once a fish has been hooked, the angler turns the crank, which retrieves the line and winds it back onto the spool.
There are certain parts that all fishing reels have in common:
- Spool – this is the part of the reel around which the fishing line is wound. It resembles a spool of sewing thread but larger. A spool’s storage capacity for fishing line will depend on the size of the reel and the length and thickness of the line itself.
- Handle – a hand-operated crank that is used to retrieve fishing line from the water and wind it back onto the spool.
- Gears/Drives – these are the inner workings of the reel that either rotate the spool to rewind fishing line (baitcasting reels and fly reels) or move a rotor and bail arm around the spool to evenly rewind fishing line (spinning reels and spincasting reels). In most reels, the gears create a multiplier effect whereby one turn of the handle generates multiple revolutions of line around the spool.
- Foot – the foot of a fishing reel consists of two metal prongs that fit within cylindrical seats on the fishing rod and are attached via threaded rings that, when tightened, firmly lock the reel into place. This system allows reels to be easily interchanged or removed for cleaning or re-spooling with new line.
Certain reels are better suited for different types of fish, baits and lures, and habitats. How fishing reels differ is (1) in the way that the spool is mounted and oriented on the reel, (2) the manner in which the spool locking mechanism is disengaged to allow for fishing line casting, (3) how fishing line unspools during line casting and (4) how the crank engages the gears and drives.
While the basic approach to cleaning any type of fishing reel is the same, as we will examine in this article, there are particular cleaning methods for specific types of reels. For example, spinning reels are the most widely used type of reel and probably subject to the most abuse, while baitcasters are more likely to have bits of underwater vegetation in them because they are the big game fish angler’s reel of choice.
Spinning Reels
This is perhaps the most common type of fishing reel with broad appeal among beginners and experienced anglers alike. They are widely adaptable to various types of lures, baits, and even different weights (thicknesses) of fishing line. Larger models are able to accommodate significant lengths of line and can bring in big species of fish. Spinning reels are also referred to as open-face or open-bail reels.
Notable Features
One of the most notable features of a spinning reel is that the spool is oriented in-line (runs parallel to) to the rod and does not rotate. The spool and fishing line are exposed, and the reel itself is designed to hang from the fishing rod (as opposed to sitting on top of the rod).
Spinning reels utilize a system comprised of a bail arm and rotor that rotates around the spool as the angler turns the handle. As the fishing line is retrieved, the spool bobs back and forth while the bail arm and rotor spin around it, guiding the line as it is evenly wound around the spool.
When the u-shaped bail arm is flipped open, and the rod is flung forward, the weight of the lure will pull line off the spool as it moves forward. To retrieve line, the bail arm is flipped closed and the angler turns the handle.
Spincasting Reels
Spincasting reels (also known as closed-face reels) are similar to spinning reels in that they have spools that are in-line with the rod, and are considered the ideal entry level fishing gear for novices and newcomers to the sport, particularly children. As far as line tangling spincasting reels tend to be the most resistant to this problem which can plague other types of reels.
Spincasters are typically the least expensive of all fishing reels, which make them appealing to recreational anglers who fish but several times a year. Spincasting reels are used for lighter baits and lures, and they have fairly small spools, which limits the amount of line they can hold; because of this, the casting distance is limited.
To an experienced angler, these characteristics are viewed as shortcomings which is why spincasting reels would not be found in the tackle boxes of big game fish fishermen. Limitations as far as retrieval speed (how quickly a fish can be reeled in), and the size and weight of tackle (line, lure, hook and bait) on the line restrict the number of fish species that can be targeted and the types of habitats that can be fished.
Notable Features
One distinguishing feature of spincasting reels is the conical cover that shields the entire spool creating a complete enclosure with only a small opening at the nose of the cone through which the fishing line feeds. Because of this spool cover, spincasting reels lack the rotor and bail arm that are found on spinning reels, relying instead on pick-up pins mounted on a rotating collar that evenly winds line on the spool.
Spincasters rely upon a thumb-activated button at the back of the reel to cast line. This is the most basic casting system of all fishing reels, which is one of the reasons that Spincasters are popular among beginner anglers.
Baitcasting Reels
Baitcasting reels (commonly referred to as baitcasters) are the preferred choice for experienced anglers for whom fishing is a serious endeavor. These are typically more expensive than spinning reels and are more complex to operate and difficult to master. In the hands of a novice, more time will likely be spent untangling jumbled fishing line than actually fishing.
Unlike spinning and spincasting reels, the spool on baitcasters sits perpendicular to the rod and does rotate when fishing line is retrieved.
Furthermore, the spool also rotates when fishing line is cast, and this is what makes baitcasters very difficult to master as it takes a lot of experience to avoid fishing line backlash which occurs when the forward motion of the fishing line slows or stops, but the spool keeps spinning and continues releasing line, resulting in a tangle so extreme it is commonly referred to as a bird’s nest.
Notable Features
Serious anglers prefer baitcasters because of the accurate casting that they afford along with greater distance. Baitcasting reels feature several mechanisms that allow setting precise casting adjustments according to specific types of lures and baits and fishing line weights. Certain anglers will make even the minutest of adjustments when changing from one lure to a seemingly similar one.
Spools on baitcasting reels can typically accommodate thicker fishing line, which allows for larger hooks, lures and baits to target larger, feistier species of fish. With the growing popularity of professional bass fishing one need look no further than the typical setup of any competitor to see that baitcasters are the reel of choice for anglers whose livelihoods depend on consistently landing fish.
Baitcasting reels have a faster rate of retrieval compared to other types of reels, which is necessary for many species of game fish. As with spinning and spincasting reels, there is an adjustable drag feature that facilitates landing fish and prevents line breaks.
How to Clean a Spinning Reel
Now that we have become familiar with the three major types of fishing reels, we can go over how to perform a thorough, deep cleaning. We will begin with step-by-step cleaning procedures for the spinning reel since it is the most popular type of reel. Most of these steps will also be applicable to cleaning spincasters and baitcasters so this is a good place to start.
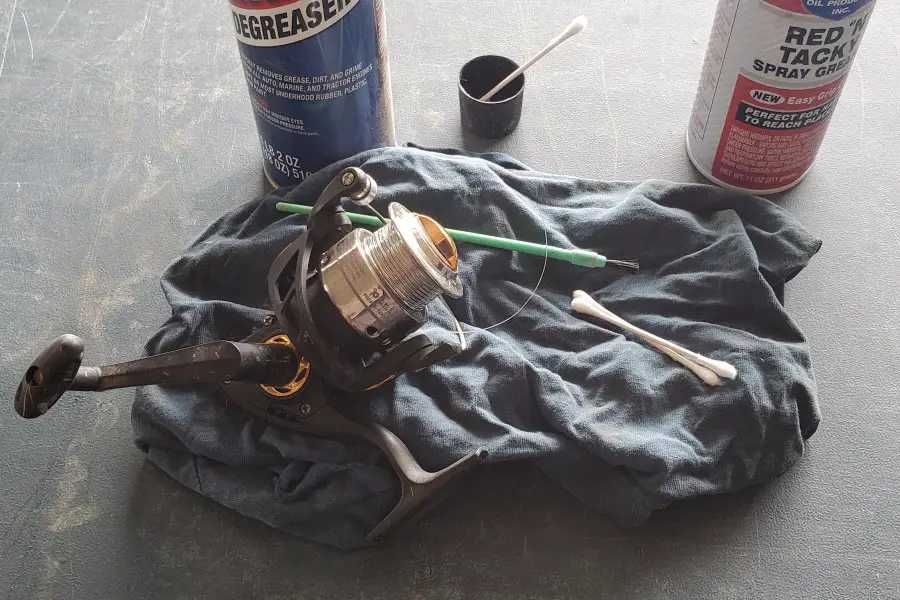
Here is a list of supplies and tools that you will need:
- The instruction manual that accompanied your reel as this will contain a schematic of parts that will be useful to guide you in the dis-assembly and re-assembly of the reel, and it should also provide the recommended oil and/or grease for lubricating components;
- A set of Phillips and flathead screwdrivers;
- A set of wrenches;
- Needle-nose pliers and channel locks;
- Q-tips;
- Toothpicks;
- An old paintbrush (small);
- Clean rags or shop towels;
- An old toothbrush;
- Degreaser.
Cleaning the Exterior of the Reel
Using the toothbrush gently brush away any dirt and grime from the reel body, handle assembly and spool area. Once the larger particles are removed, use a clean damp cloth to wipe all the surfaces of the reel. Moistening the cloth with several sprays of degreaser may help to remove stubborn marks or stains, but be careful not to get any degreaser on the spool or fishing line as the scent may later repel fish in the water.
Spraying the exterior of the reel with a gentle stream of water may help to loosen up and rinse away dirt. However, it is important to avoid spraying water directly into or near any bearings or openings where water can come into contact with moving parts like gears and pinions. Once the exterior of the reel has been cleaned, dry all surfaces with a clean towel before proceeding to dis-assembly.
Disassembling and Cleaning the Interior of the Reel
Once the exterior of the reel has been thoroughly brushed and wiped clean, we can proceed to dis-assembling the reel to clean the interior components. Fishing reels rely upon mechanical components such as gears, bearings, and bushings that require various forms of lubrication, and over time this lubrication can accumulate dirt, particles and even minuscule shavings from the moving parts themselves.
As you dis-assemble the reel, it is important that you do so in an orderly fashion so that re-assembly will be minimally challenging. It may be wise to place dis-assembled parts on a clean, non-slip surface and lay them in the same sequence that they were removed. This is particularly important with certain components that are grouped together, for example, gears with washers, spacers and retaining clips.
In addition, it will be necessary to remove small screws that may not necessarily be of the same size or length, so it is important to note which particular location they came from. Many professionals and amateurs alike recommend taking pictures with your smartphone of the reel in its various stages of cleaning and disassembly so that you have a visual record to refer to should the need arise.
Step One – Remove the Spool
The adjustment knob for the drag sits on the cap of the spool. Loosening the drag completely will unscrew the knob, which then allows the spool to be slid off of the spool shaft. Visually inspect both the spool cap and the spool itself for dirt and grime and wipe clean. Do the same for the spool shaft. Set these components off to the side.
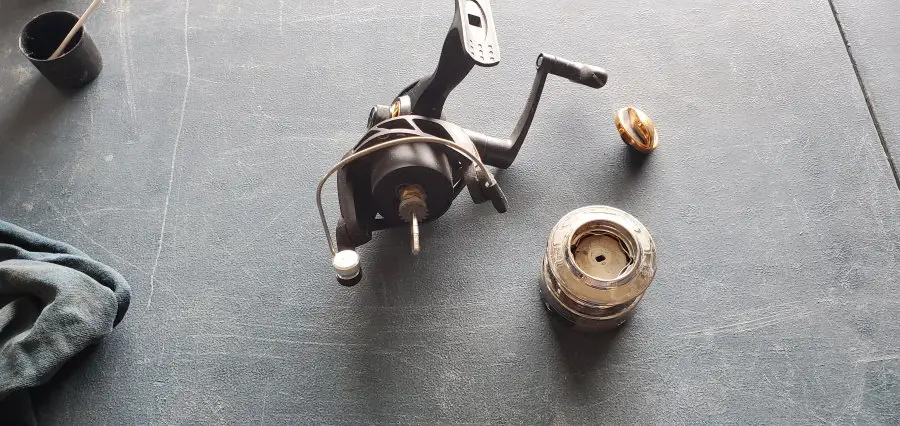
With the spool removed inspect the rotor and bail arm assemblies and wipe clean. For hard to reach areas use a Q-tip to remove dirt, grime, and old lubricant. It may be necessary to use a degreaser to completely remove residue. Try to avoid spraying degreaser directly onto any reel components; instead, spray degreaser onto a cloth, or dip the swab end of a Q-tip into a small bowl of degreaser.
Step Two – Remove the Handle
The handle is attached to a shaft that extends all the way through the body. On the opposite side of the reel body from the handle should be a nut that, when loosened and removed, allows the handle to be slid out from the body (there may be a hex nut that also needs to be removed). Examine the entire handle assembly and wipe away any grime.
TIP: On most reels, the handle can be positioned for right-hand or left-hand operation. Simply slide the handle shaft into the body according to the hand-operation orientation you prefer and attach the locking nut on the other side.
Step Three – Remove the Rear and Side Plates
To gain access to the gears, it will be necessary to remove the rear and side plates. Typically they are fastened with Phillips screws of varying sizes and lengths, so it is important to note which screws came from where. On some spinning reels, the rear plate must be removed first before the side plates can be unfastened.
Carefully wipe the interior surfaces of all plates and covers you have removed. Pay particular attention to any areas where old lubrication has gathered. It may be necessary to use a brush to remove any grime that has hardened.
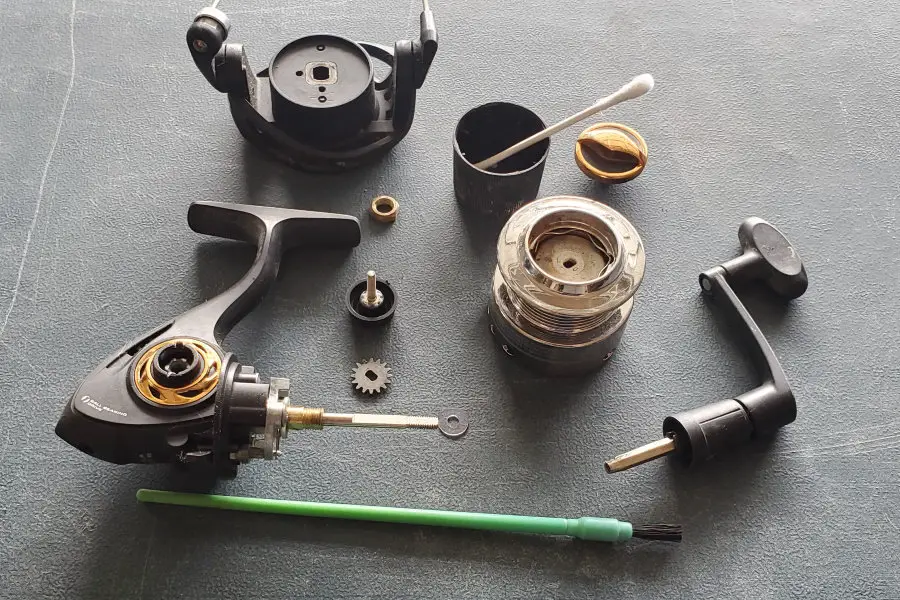
Step Four – Remove Old Lubrication from Gears, Bearings, and Bushings
With the side plates removed, you will be able to inspect the gears, bearings, and bushings. Using Q-tips gently and carefully wipe away any visible grime and old, dirty grease. It may be necessary to manually turn some of the gears in order to thoroughly clean them. Exercise caution so as not to dislodge any of the gears. For particularly grimy areas, it may be advisable to first scrape away old lube and then wipe with Q-tips.
NOTE: Many newer reels have a small access port through which lubrication can be applied without unfastening any plates or covers. However, this will only mix new lubrication with old. For improved performance and longevity of your reel, it is recommended that moving parts be periodically cleaned and re-lubricated.
NOTE: In this guide, we clean the gears without removing them. For those qualified to do so, removing gears and other components will provide even greater access to innermost parts for maximum cleaning and lubrication.
Step Five – Lubricate the Gears
Once the gears and such have been cleaned and the old lubrication removed, you can apply fresh grease using a small paintbrush. Avoid applying gobs of grease as it may do more harm than good. A simple, even coating of fresh lubrication is sufficient to keep things running smoothly. With a small amount of grease on the tip of the brush carefully dab the gear teeth to coat them with lubricant. Repeat this process for any pinions or other toothed parts.
TIP: The instruction or owner’s manual that accompanied your reel should specify the type(s) of oil and/or grease to be used. Pay heed to these recommendations as use of the wrong product may damage components in your reel. Many reels include vials of lubrication inside the original packaging.
TIP: Many reel manufacturers recommend both oil and grease for various components in the reel. As a general rule, grease should be applied to components with teeth such as gears, pinions, and ratchets. These components are typically compartmentalized and protected from dust and dirt. Since they rotate quickly, oil is not recommended since they can sling off lubrication that is too thin.
Oil should be applied to bearings, bushings, and external parts, particularly those that are exposed to the elements because dirt can accumulate faster in grease.
Re-fasten the side and rear plates once the lubrication of inner parts has been completed.
Step Six – Lubricate the Handle Assembly
On either side of the reel body where the handle shaft slides through are bearings that can be lightly lubricated with a drop of oil. Once the handle assembly has been re-attached, turn the handle for several revolutions to ensure that the oil is evenly distributed.
Step Seven – Lubricate the Spool Assembly
We now turn our attention to the spool assembly, in particular, the shaft where the spool sits. Apply a drop or two of oil along the shaft and turn the handle to ensure that it is evenly distributed throughout, including the portion that slides in and out of the reel body.
Replace the spool onto the shaft and re-fasten the spool cap. If you crank the handle rapidly and let go, the spool and handle should continue to turn for a number of revolutions indicating that they are running smoothly and have been properly lubricated.
Step Eight – Lubricate the Bail Arm
The final step of lubrication is the bail arm. Manually flip the bail arm open and closed, noting the pivot points where parts move against each other. At these points, apply a small dab of oil and move the bail arm back and form to evenly distribute the lubrication.
At this point, you have successfully cleaned and re-lubricated your spinning reel. As you read further, you can see that the cleaning procedures for spincasting and baitcasting reels are very similar with just a few minor differences.
Cleaning a Spincasting Reel
The cleaning procedures for a spincasting reel are virtually the same as a spinning reel except that a spincasting reel has a spool cover instead of a bail arm assembly. The spool cover unscrews from the reel body by turning it counterclockwise. Once the spool cover has been removed, inspect the interior for any grime and wipe clean with a cloth. The same needs to be done for the collar and pick-up pins.
As with a spinning reel, removing the spool will reveal the spool shaft, which should be cleaned and lubricated with oil. The gears should be wiped clean and re-lubricated with grease.
Just as the bail arm needs to be lubed on a spinning reel, the push button mechanism (spool release for casting) should be cleaned and lubricated on a spincaster.
Cleaning a Baitcasting Reel
Although the spool orientation is different on a baitcasting reel, as far as cleaning and lubricating the components, the procedures are very similar to those we use for spinning and spincasting reels. There are however several things to watch out for when it comes to cleaning baitcasters.
Baitcasters, in general, are considered higher-end equipment used by serious anglers who target big game fish. Many of these species, such as bass, live in waters with heavy underwater vegetation. As such, a lot of plant material will come up with the fishing line when it is retrieved, and a significant amount of residue will end up in the reel’s components.
Line Guide and Worm Drive
These are components that are unique to baitcasters, and they can become dirty and grimy with prolonged use, particularly where frequent casting and retrieval are involved. Plant material and vegetation can sling off the fishing line as it is being retrieved and can accumulate on these components.
A Q-tip will effectively wipe away any residue, and a toothpick (or even a Q-tip with the cotton swab ends snipped off) is the perfect tool for re-applying fresh lubricant.
Braking System
The brake is another component unique to baitcasters, and it is typically found behind one of the side plates. Once exposed, you will see a series of pins arranged in a circular pattern. These must be very carefully wiped clean and a very light coating of oil should be applied so as to no impair the braking action that they pins serve. Also, be careful not to apply any lubricant on any of the friction surfaces.
A Note About Fishing Reel Lubricants
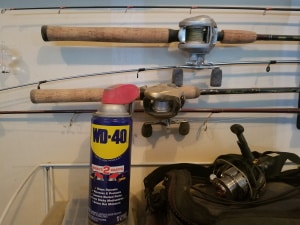
As we have now seen, fishing reels are fairly complex devices with many moving parts. Although there may be a temptation to use common household lubricants like WD-40 or Vaseline to oil and grease the various parts of a fishing reel, this practice is discouraged.
While WD-40 is certainly an effective lubricant and water displacement solution, it is an all-purpose solvent; a jack-of-all-trades in an aerosol can. The same can be said for Vaseline, which is a do-it-all petroleum jelly that has applications ranging from protecting dry skin from the elements to adding some shine to a leather handbag.
When servicing your fishing reel, it is advisable to use products that are specially formulated for this specific purpose. Many fishing reel manufacturers sell fishing reel oil and grease and even offer all-in-one maintenance kits like these ones on Amazon, that not only include different types of lubes but also contain all the tools needed to dismantle parts and various accessories to clean them.
While cleaning your own fishing reels may seem like a daunting task, especially the first time around, the reward is a finely tuned, smooth-running apparatus that can bring you years of recreation, lots of memories, and perhaps a tall tale or two about the one that got away.